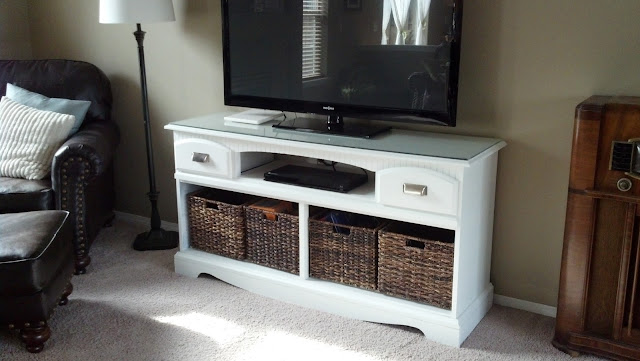
Tonight, I am so excited to share with you what hubby has been working on for the last few months in his spare time. Let me preface by saying that we've had our TV hanging on the wall above our fire place since we purchased it about a year ago. And though I liked it there and it fit well, it wasn't exactly what I had in mind. You see, while the TV is on and you're sitting on the sofa curled up in a warm blanket drinking hot tea, you can't have the gas fireplace running. Not only do I use the TV for viewing movies and television shows, but I listen to a lot of music through it. I love our fireplace but would love it more if I could use it! So to solve that problem I was on a mission to find a nice TV stand.
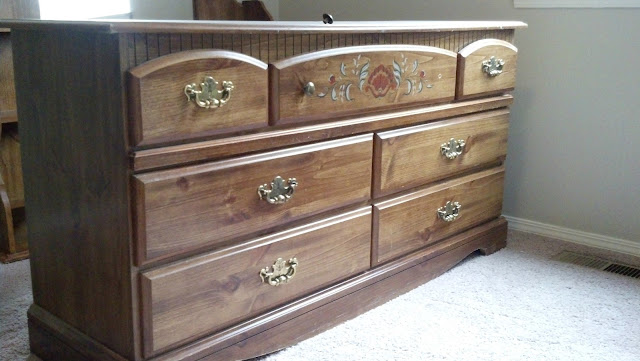
After searching online and finding a lot of great furniture options, I realized I didn't really want to spend any money. We had a dresser gifted to my husband years ago that we were planning on selling or donating but I really wanted to find a new use for it since it didn't really match our decor style. I came across the dresser-turned-TV-stand idea from pinterest and knew it would be perfect! The dresser was made very well and has been incredibly sturdy. Oh, I just love making old things new!!
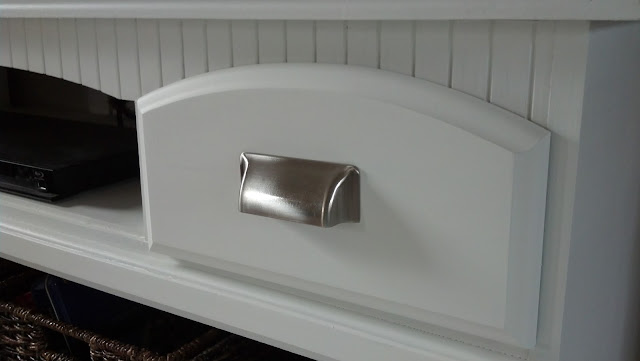
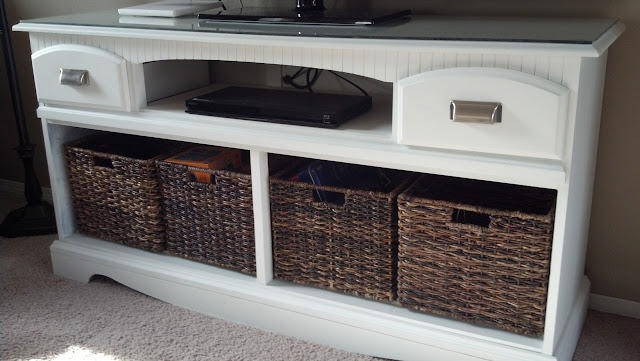
First thing hubby did was take out the drawers and support beams inside the dresser (not shown). He also cut, painted, and installed a long board (the length of the dresser) for the bottom of the dresser for additional support for the baskets. Long story short...hubby sanded every square inch, primed, and painted...then put on a few coats of paint. He also cut and sanded the glass overlay to protect the top of the stand (using 1/4" plate glass). My job was easy: I went shopping for the drawer pulls and wicker baskets! I also installed the drawer pulls.
I couldn't be any happier with the way this "new" TV stand turned out!
WICKER BASKETS: Threshold Global Large Milk Crate, Dark Brown from Target (here)
DRAWER PULLS: Liberty 3 in. Rectangular Bin Cabinet Hardware Pull in Satin Nickel from Home Depot (here)
PAINT: Glidden Interior Paint, White on White tint base, with a flat matte. GL9000 from Home Depot. Couldn't find a link to it on the website. The closest match is here.
PAINT: Glidden Interior Paint, White on White tint base, with a flat matte. GL9000 from Home Depot. Couldn't find a link to it on the website. The closest match is here.
Have you found new uses for old things in your home?


Love it! I just picked up a dress on the curb that I want to do something simlar with. Question for you - that part towards the top with all the little ridges - how did your husband sand that part? The one I picked up has lots of detailing like that and I am a bit intimidated by the sanding...any advice would be appreciated. Lookes great!!
ReplyDeleteOh, thank you so much! On the front top slats, hubby sanded some and then primed and painted. You can actually paint over lacquer (years ago hubby worked in a paint shop) but it is a good idea to buffer first if you can. To save a little time, you could purchase a paint and primer-in-one rather than doing an extra step of painting, then priming. Hope this helps! And thanks again!
DeleteAwesome! Thanks so much!!
DeleteI love this and want to do this as well for our mancave. Were there slats to support the middle drawers, and did hubby just saw them out? You both did a fantastic job. And you've inspired me to go to my workout. :)
ReplyDeleteHello there! Thanks for checking out the post! Yes, there were supports inside and hubby did use a saw to get them out. Since he surprised me with the start of this project, I didn't get any photos before he took them all out! I will need to update the post and include that hubby also installed a board on the bottom of the dresser for additional support for the baskets. Thanks LeighAnne! What are your workout goals? Any specific program you're thinking of? Hitting the gym?
DeleteI really love what you did here!! Can I ask what type of paint you used?
ReplyDeleteWe used Glidden Interior Paint GL 9000. It's a white on white tint base with a flat matte. Thanks for your interest!
DeleteI would use a satin paint because it cleans much better than a flat paint.
DeleteI have an almost identical dresser and would LOVE to upgrade it... of course then I'd have to do the other dresser, headboard and 2 bookshelves... :/ But this looks awesome!! Maybe someday I'll feel ambitious!
ReplyDeleteOh my goodness, yes, doing all of them would be a lot of work! Maybe do them in stages? There are so many minimal changes though that you can do to change the look of something...like drawer pulls for example. If you're not on pinterest, you should check it out. So many awesome ideas out there!! Have a great day!!
DeleteHoly....I still have that whole bedroom suit (from 1983, I think) at my parents house. I am TOTALLY taking it back! You have inspired me. Yay!!!!
ReplyDeleteI think you're right, from 1983!! Awesome, thanks so much!!! :)
DeleteWas this a laminate finish or stained wood? And if laminate, did you have to work about it peeling away? I have some 1970's girls white and gold French provincial furniture I would love to be able to paint and saw a project online where it had been done but I am afraid to have it bubble or peel away. Love your project and am inspired to use your idea.
ReplyDeleteI would sand it well and prime then paint. I have a laminate sleek topped dresser that Im planning on painting. definitely putting in the work to sand it.
DeleteUse an oil based paint. Oil based is ideal for furniture. Only draw backs - the stuff smells so its best to paint with it outside, takes longer to dry, and oil based is nearly impossible to paint over in future projects. But it lasts.
DeleteWe painted a real wood dresser, a formica side table, and one of those cheap pressed wood and laminate shelving cabinets with a black oil based paint and we DID NOT sand even one piece! The transformation was beautiful and has lasted over 2 years without nicking, or scratching!
We plan on doing the dresser project this weekend (in black) and am completely stoked to get started!!
I'm so so so so sooooooooooooo in love with this, and so is my boyfriend !! We've been stressing over finding a TV stand that's cheap but big enough to hold his grandfather's 50 in. TV that we're inheriting in a few weeks and this is PERFECT !! I'm so glad I found it on Pinterest ! Hopefully this will be the first of many DIY projects we take on in our first place, outside our parents', and I can't wait to be able to feature them on my own blog. Thank you for the inspiration !! :D
ReplyDeleteThanks so much Tiffany! Oh you will have so much fun with all of your projects and nesting! Enjoy your new place!
DeleteJulie! OMG this transformation is SENSATIONAL! I am loving it! Thank you for giving me a great idea. I have a dresser that is..well..I don't like it much bcoz the drawers get stuck, and I could definitely do this with it. How long did the paint take to dry?
ReplyDeleteWow, thank you for the kind words! I believe he painted 3 coats and waited an hour or so before starting the next coat. But, we did wait about 48 hours before we put the baskets in just to make sure the paint fully cured (still tacky at 24 hrs). Hope this helps!
DeleteGreat makeover!!! Can't wait to try to find something similar to copy yours!
ReplyDeleteThanks so much! Thrift stores are your best bet, so many great furniture pieces out there!
DeleteThis is amazing, found it on pinterest and want to try it too!thanks for the great tutorial
ReplyDeleteThanks Colleen! Glad you like it!
DeleteI love this?? I can't wait till my hubby starts on ours. My hubby will be doing this soon to a dresser we have and I wanted to know what did you husband use to paint it? Brush or roller or spray paint. My hubby wants to use spray paint since there is so much detail on the dresser but I think he is lazy. thank you. hahaha.
ReplyDeleteThanks! We used a brush. If we had a sprayer we probably would have done it that way.
Deleteoops one more question, where did your husband find the glass he put at the top of the dresser? thank you
ReplyDeleteHe works at a glass shop here in town so it was easy access. He used 1/4" plate glass if that helps.
DeleteI love this! I found this on a friend's post on FB about Consign Design in Seattle. I just pinned it so I can remember it for the future. Awesome blog entry!
ReplyDeleteThis was an awesome idea. I love it!
ReplyDeleteOh my goodness...I have that same exact dresser with mirror and shelves on each side (the mirror and shelves unit are attached with brackets). I even have the dresser that goes with it. Headboard was replaced years ago. I didn't realize I had an antique. Thank you for the wonderful idea! :)
ReplyDeleteI am so going to do this. I have dresser that would fit perfectly in my living room. Entertainment centers are expensive.
ReplyDeleteI love what you did to this dresser.but I am wondering why you could not use the fireplace and tv at the same time when the tv was hanging on the wall?My tv hangs above my gas fireplace and I use both all the time.
ReplyDeletethis just gave me a great idea i was thinking about getting rid of mine but now it has a purpose
ReplyDeleteLove it! I'm sitting here staring at the dresser I want to do that with. CAN'T WAIT to show this to the hubs. Caught this on FB, btw, from a repurposing-crazy friend, shared on Flipboard.
ReplyDeleteThanks a bunch fir posting this. I'm thinking this could give me something to do for a small side business / hobby. Gonna start hitting the yard sales
ReplyDeleteThank you for posting this it is a fab find I can't wait to find my dresser
ReplyDeleteI am so going to do this!! I have an old dresser in the basement that will be perfect for this!! Great idea!!!
ReplyDeleteThis is completely awesome! I wish I had the space to do projects like this! You guys rock! LOOKS SPECTACULAR!
ReplyDeleteOH! May I ask what kind of sander your husband used?
ReplyDeleteWe have the same old radio!!! Great diy project too!
ReplyDeleteWhat kind of wood did your husband use as the extra support for the baskets? And how did he put it in there?
ReplyDeleteWhat size were the boards that your husband put on the bottom to support the wicker baskets?
ReplyDeleteLove this
ReplyDeleteHi there! I didn't see in your tools list a saw for cutting the wood divider between the bottom shelves and middle shelves. What did your boyfriend use to do this?
ReplyDeleteI love this so much. I'm trying to find a dresser like yours so I can copy it. Thanks!
ReplyDeleteI am so excited to try and do a makeover like this for my living room... but can I find a dresser anywhere that isn't brand new and hundreds of pounds? NO ����
ReplyDeleteWhere did you purchase this dresser, I have been trying to find it forever. (:
ReplyDeleteI literally just bought this exact dresser at the thrift store this afternoon! I plan to use it both as a tv stand and as a dresser. So I am going to take out the middle top drawer and possibly the two small ones as well. I am so excited to see how somebody else converted this same dresser!
ReplyDeleteI did this with a discarded dining room sideboard. It was quite old, ugly, and had been ultimately used as a garage work table. Someone had glued and nailed vinyl flooring to the top of it to use it as a work bench. I removed the old flooring, sanded the entire piece, and painted it a hot teal color. I actually kept the original pulls as they were kind of interesting and added unique detail. I just painted them the same teal color as the wood. It turned out to be beautiful, if I do say so myself. It's unique, adds a great pop of color to my navy/beige/turquoise room, and was cheap. I bought the sideboard for $10 off craigslist; a few cans of teal spray paint later and I have a cool storage piece for my dining room.
ReplyDeleteHi from Bishkek!))) It's cool!!))
ReplyDeletei am so excited to try this out, i saw this post and loved it, started to look for a dresser ad never could find one i like. But a week ago i cam across this EXACT dresser for only 20 $ going to start it this week!!
ReplyDeleteSuperb work you well done on this blog, I am deeply read your blog I got of many information on this, keep sharing like this type of blog, I hope you will be create soon this type of blog and valuable information, I am waiting for your new blog, I hope I will be see you soon, thank you so much for read my comment, I am suggest to you all comment reader please read this blog he will be mention lot of information on this please go and read it, If any one searching dynamic website designing company in Delhi in cheap rate please go on my website, we are do for you any think.
ReplyDeleteDynamic Website Designing Company in Delhi
I like to read your article, I got a many useful information on this blog, I think you will be share with us like this type of article, keep share more like this type of topic am happy to see your blog post, thank you so much for share this useful information with us, If any one grow up looks and life style please come on my website.
ReplyDeleteLifestyle Magazine
Nice Post thanks for sharing it’s very useful. This article gives me so much information.
ReplyDeleteBest website designing company in Kashmiri Gate
I am really happy to read this blog post, you have many information put it on this article. Mobile Apps Development Company Delhi
ReplyDeletereally amazing article. really nice way of define the things. Android App Development Company in Delhi
ReplyDelete
ReplyDeleteThis is really great!!! Could you give us some tips
TV Stand
Nice blog! Full of informative ideas. Thank you, keep sharing.
ReplyDeleteThanks you so much for your efforts blog, If your are looking for a creative mobile app development in mumbai, Appslure provides one of the best and professional app development company in delhi.
ReplyDeleteMobile app development company in mumbai
Hi. Your site is very good and useful.
ReplyDeleteچت
چت روم
باران چت
ققنوس چت
This is completely awesome! I wish I had the space to do projects like this! You guys rock! LOOKS SPECTACULAR!
ReplyDeleteBedroom Furniture nz
It is wonderful information regarding the post so thanks for sharing
ReplyDelete