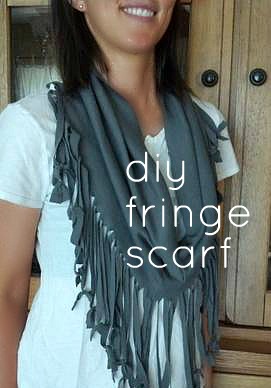
Happy Monday morning all! What a gorgeous day it is here! So, I wanted to quickly share a little DIY project I completed this weekend. This is probably one of the simplest projects I have done to date. I'm not exactly sure where the original idea came from but I found a tutorial from pinterest and here. The best part about this accessory is that it's FREE. You can get it right out of your own closet. Oh, and there is no sewing involved, BONUS!
What you will need:
1. An old t-shirt
2. Sharp scissors (ideally fabric scissors because they make the cleanest lines)
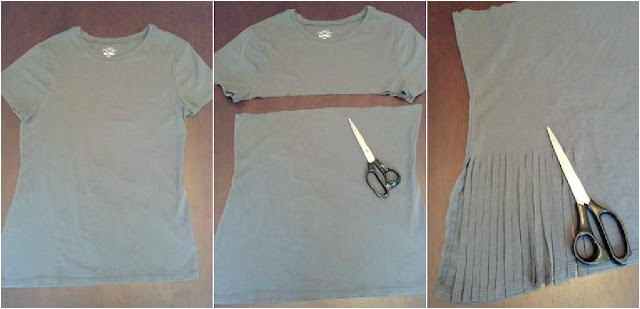
Step 1: Lay your t-shirt down on a flat surface. Make sure that the two bottoms of your shirt are even. Smooth out any bumps or wrinkles in the shirt.
Step 2: Take your scissors and cut horizontally across the shirt, just below the armholes to create a rectangular tube.
Step 3: Take the bottom portion and re-lay it flat. Starting at the bottom of the shirt with the hem, cut from one end and work your way over to the other side. You can make the fringe pieces as short or long as you'd like. I would probably cut between 4-6 inches in length. You may also want to slice the sides of the shirt right up the middle since they are folded over and would be double the width of the strips you are cutting.
Step 4: Place your finger at the top of the fringe to hold the shirt and with your other handgently aggressively tug the fringes. That way they will look more like string rather than a flat piece of fabric. The ends will curl making it look like a clean cut.
Please note that the first time I pulled the strips, nothing happened. They didn't change and look like string...I must have cut them too wide. So instead of cutting them in half I decided to change it up a bit and knot the strips instead!

Step 5: Take the top of the scarf and sort of bunch it up a bit and place around your neck!

What you will need:
1. An old t-shirt
2. Sharp scissors (ideally fabric scissors because they make the cleanest lines)
Step 1: Lay your t-shirt down on a flat surface. Make sure that the two bottoms of your shirt are even. Smooth out any bumps or wrinkles in the shirt.
Step 2: Take your scissors and cut horizontally across the shirt, just below the armholes to create a rectangular tube.
Step 3: Take the bottom portion and re-lay it flat. Starting at the bottom of the shirt with the hem, cut from one end and work your way over to the other side. You can make the fringe pieces as short or long as you'd like. I would probably cut between 4-6 inches in length. You may also want to slice the sides of the shirt right up the middle since they are folded over and would be double the width of the strips you are cutting.

Step 4: Place your finger at the top of the fringe to hold the shirt and with your other hand
Please note that the first time I pulled the strips, nothing happened. They didn't change and look like string...I must have cut them too wide. So instead of cutting them in half I decided to change it up a bit and knot the strips instead!

Step 5: Take the top of the scarf and sort of bunch it up a bit and place around your neck!

Voila! What do you think? It would also be fun to use t-shirts with a lot of color and pattern on them for more pizazz! I could have also probably gone around my neck twice with the scarf since there is a lot of fabric if I wanted a tighter, cozier look.
Comments
Post a Comment